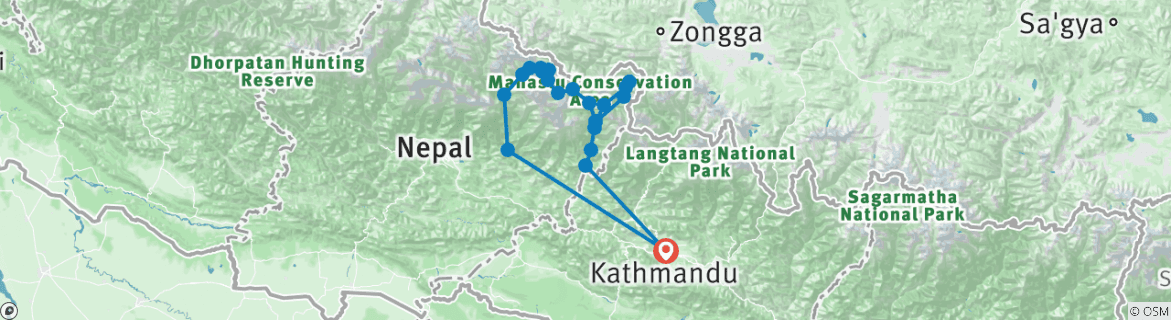
Itinerary
- Day 1
Arrival in Kathmandu
A Visit Himalaya Treks representative will meet you at the airport and take you to your hotel in Kathmandu. This gives you a chance to settle in and get oriented after your travel.
- Day 2
Kathmandu
You'll spend the morning on a guided half day tour of historical and spiritual attractions, including some World Heritage Sites around Kathmandu. After lunch, you'll meet with your trek leader who goes over detailed briefing on what's ahead and covers all the trek information you'll need.
- Meals
- Breakfast
Included Activities
- Half day sightseeing in Kathmandu with city guide
- Trek leader meeting and briefing
- World Heritage Sites tour
- Day 3
Kathmandu to Sotikhola
An early start gets you driving toward Sotikhola via Arughat. The highway eventually transitions into newly built dusty roads as you head into more remote areas. After 8 to 9 hours of driving, you'll arrive at Sotikhola where you'll camp for the night.
- Meals
- Breakfast, Lunch, Dinner
- Day 4
Sotikhola to Machha Khola
Your trek starts heading north and follows the Budhi Gandaki River for the entire day. The trail crosses and re-crosses the river multiple times using suspension bridges. You'll pass through Lapu Beshi on sandy river banks, then continue to Machha Khola where you'll camp after 6 to 7 hours of trekking.
- Meals
- Breakfast, Lunch, Dinner
Landmarks Budhi Gandaki River - Day 5
Machha Khola to Jagat
This morning's trek through Khorlabesi is relatively easy, and you'll make a quick stop at Tatopani to check out the natural hot spring. From there, a steep climb through Dobhan follows before you descend to Yaru Beshi on the Yaru Khola banks. Final climbs take you through Jagat village by the Budhi Gandaki River after 5 to 6 hours total.
- Meals
- Breakfast, Lunch, Dinner
Optional Activities
- Visit to Tatopani hot spring
Landmarks Tatopani Hot Spring Yaru Khola - Day 6
Jagat to Lokpa
After some time on sandy river banks, you'll tackle a steep climb near Sirdibas. A dramatic suspension bridge crossing brings you to Phillim, which is the largest village you've encountered so far. The trail starts losing elevation as you enter Tsum Valley with a relatively comfortable path and a final brief climb to Lokpa. From here you can see Ganesh Himal at 7422m and Shringi Himal at 7187m in opposite directions. The trek takes 5 to 6 hours.
- Meals
- Breakfast, Lunch, Dinner
Landmarks Ganesh Himal Shringi Himal Phillim - Day 7
Lokpa to Chumling
You'll pass three suspension bridges in the morning before tackling a steep ascent for most of the day. As the trek enters higher elevations, the late day climb transitions to a gradual walk reaching Chumling. It's a shorter day at approximately 4 hours because you're gaining altitude and need time to acclimatize.
- Meals
- Breakfast, Lunch, Dinner
- Day 8
Chumling to Chhokangparo
This trek on gentle terrain takes you higher into Tsum Valley. The trail follows one of the tributaries of the Budhi Gandaki River most of the day. You'll pass a small monastery and cross another tributary while slowly ascending to Chhokangparo, the biggest settlement in Tsum Valley. Several mountains are visible from this village, and the trek takes approximately 6 hours.
- Meals
- Breakfast, Lunch, Dinner
- Day 9
Chhokangparo to Mu Gompa
An easy trek starts by going through small villages of Leru, Ngakyu and Lamagaun. You'll make a brief visit to Milarepa Cave before the trail continues on the riverbed passing Lar, Phurbe, and Pangdun villages. Then you'll reach the twin villages of Chule and Nile. Following the river, you slowly climb through a narrow valley with a final steep climb to exit and reach Mu Gompa monastery. No teahouses are available here, so you'll stay inside the monastery with modest facilities. The trek takes 6 to 7 hours.
- Meals
- Breakfast, Lunch, Dinner
Included Activities
- Visit to Milarepa Cave
Landmarks Milarepa Cave Mu Gompa - Day 10
Mu Gompa to Chhokangparo
The trek retraces your route back to Lar village, then takes a different route returning to Chhokangparo via Rachen Gompa. The terrain feels similar to yesterday's trek even though you're going a different way. This takes 5 to 6 hours.
- Meals
- Breakfast, Lunch, Dinner
Included Activities
- Visit to Rachen Gompa
Landmarks Rachen Gompa - Day 11
Chhokangparo to Gomba Lungdang
After descending to Dumje village, you'll face a long steep climb in a different valley. The terrain gradually becomes easier but continues climbing, ending at Gomba Lungdang where Ganesh Himal stands close by at 7422m. No teahouses are available, so you'll stay inside the monastery with modest facilities. The trek takes approximately 5 hours.
- Meals
- Breakfast, Lunch, Dinner
Landmarks Ganesh Himal Gomba Lungdang - Day 12
Gomba Lungdang to Lokpa
The trek retraces the route you traveled before, heading back through Dumje to Chumling. From there you continue on the same route to end at Lokpa. This takes approximately 6 hours.
- Meals
- Breakfast, Lunch, Dinner
- Day 13
Lokpa to Deng
After a brief descent into narrow valleys, you exit Tsum Valley and rejoin the Budhi Gandaki River. Crossing the river, the trek steepens before steadying near Pewa. An uphill walk for the rest of the day brings you to Deng. You'll notice the culture shifts noticeably here with Tibetan influence evident in the people, culture, and architecture. The trek takes approximately 5 hours.
- Meals
- Breakfast, Lunch, Dinner
- Day 14
Deng to Namrung
A quick descent to the river is followed by a steep climb to Rana village. The trail drops and gradually ascends to Bihi Phedi then undulates through the valley reaching Ghap. From there you continue gaining height through forest following the smaller Budi Gandaki River. A steep forest climb to Namrung ends the day. This is a longer trek at 7 to 8 hours.
- Meals
- Breakfast, Lunch, Dinner
- Day 15
Namrung to Lho
You're now at higher altitude. The terrain starts easy but then transitions into an uphill climb to Shyo village. Views of Manaslu at 8163m appear to the west. The path drops into the river then climbs again reaching Lho. The trek takes 4 to 5 hours.
- Meals
- Breakfast, Lunch, Dinner
Landmarks Manaslu - Day 16
Lho to Shyala
The trail drops into the river then climbs to Shyala. As the valley opens up, the trail transitions to an easy walk through pasturelands. This takes 4 to 5 hours.
- Meals
- Breakfast, Lunch, Dinner
- Day 17
Sama Gaon
This is your rest day at Sama Gaon with two activity options to choose from. You can take a short hike to the nearby beautiful Birendra Taal lake, or if you're up for more, a full day hike takes approximately 6 hours to Pungyen Gomba and back.
- Meals
- Breakfast, Lunch, Dinner
Optional Activities
- Short hike to Birendra Taal lake
- Full day hike to Pungyen Gomba and back (approximately 6 hours)
Landmarks Birendra Taal Pungyen Gomba - Day 18
Sama Gaon to Samdu
The trail gradually climbs through the valley continuing to follow the river. The path steepens toward the end of the day reaching Samdu village with Samdu Ri at 6335m towering to the east. The trek takes approximately 3 hours.
- Meals
- Breakfast, Lunch, Dinner
Landmarks Samdu Ri - Day 19
Samdu to Dharmasala
The trail gradually descends briefly then ascends toward Larke Glacier. The path becomes easier ending at Dharmasala, which is at the start of tomorrow's main pass climb. The trek takes approximately 3 hours.
- Meals
- Breakfast, Lunch, Dinner
Landmarks Larke Glacier - Day 20
Dharmasala to Bhimthang
An early start with a gradual ascent takes you into Larke Glacier and up to the pass top. The summit rewards you with views of Himlung, Annapurna II, Kangguru and several peaks above 6000m. A steep descent on snow followed by glacial moraine continues for most of the day. The descent ends with a view of Bhimthang on a huge flat ground below. The trek takes 7 to 8 hours.
- Meals
- Breakfast, Lunch, Dinner
Landmarks Larke Pass Himlung Annapurna II Kangguru - Day 21
Bhimthang to Tilche
The trail quickly drops in and out of the glacier then descends toward the lower valley through forest. You'll follow the river by its banks passing Surki Khola and Goa while consistently losing altitude. The path continues downhill ending at Tilche after 6 to 7 hours.
- Meals
- Breakfast, Lunch, Dinner
- Day 22
Tilche to Kathmandu
A short walk brings you to Dharapani where you connect to the popular Annapurna Circuit trail, which is busier here due to road access. You'll take local jeep transport to Besisahar (approximately 4 hours) then continue by private car along the Marshyangdi river valley to Kathmandu. After following the Prithivi highway, you'll have time to relax and enjoy the afternoon in Kathmandu. Total driving time is 5 to 6 hours.
- Meals
- Breakfast
Landmarks Marshyangdi River - Day 23
Departure from Kathmandu
You'll be transferred to the airport two hours before your flight. This gives you time to say final farewells to your trek team and head home after your trek.